
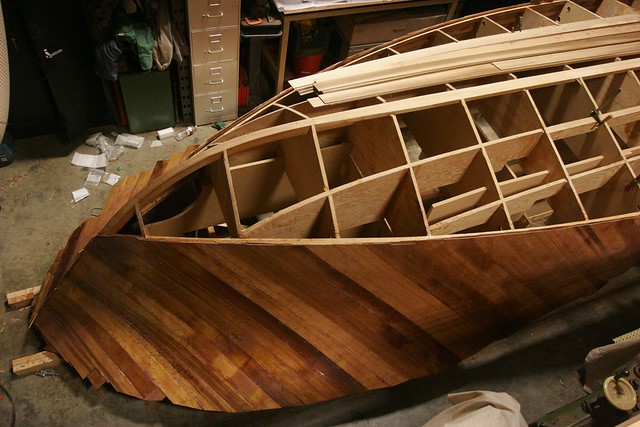
Layer two is done. It was a giant pain, but it’s done. We’re 2/3 of the way through planking the hull sides, after which we trim the edges of what we’ve already applied and move on to planking the bottom. I’m hoping the bottom goes on easier because the sides have been exhausting. Here’s the latest from the trenches:
A few learnings from this week’s labors…
First: If you ever decide to build a boat, just buy the system for shooting plastic staples at the outset. I cannot imagine pulling all the staples we needed to shoot in order to get a good bond between layer one and layer two. Some planks seem like they’re more staple than wood.
Second: When you think you’re pushing hard enough and shooting enough staples, double down on each. After we let the planking cure I went back and tapped all over the hull looking for hollow-sounding spots where the first and second layer weren’t well bonded. I found more than I’d like. According to Timm, this is not unexpected. He told me a tale of his time at Bertram when the QC guy came out after every hull was built and found all the places they needed to go back and fix. It still makes me grumpy that we didn’t “get it right the first time.”
Anyway, the root of the problem appears to be that I didn’t push hard enough and pound enough staples into the middle of each plank. I focused on the edges trying to make sure I had complete contact along them, but didn’t realize that the planks were bridging the curves between the edges. Sigh…
According to the Gougeon book, there are two things to do when you find voids. Note I said “when.” They, too, seem to imply that this is par for the course. Anyway, option one is to cut out the affected planking and either fill that area with fairing compound (epoxy putty) or glue back in a piece of planking depending on the size of the area. The other is to drill a bunch of holes, pump epoxy in as best you can, staple the hell out of it and hope for the best. Perhaps as a function of exhaustion, I opted for numero dos. Here’s a quick shot of the worst area.
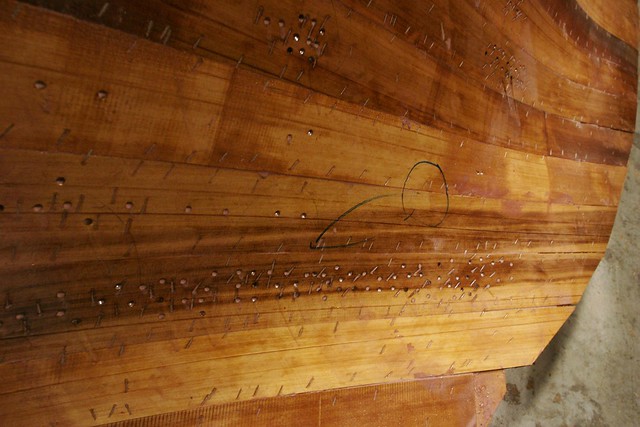
You can see all the holes I drilled and all the staples I shot around that area after applying epoxy. You can also see the circles I drew after it had a chance to cure for a bit which represent an area I need to spend some more time on tomorrow.
Anyway, a useful technique to determine if you have a problem is this: Drill two holes in the area you think may not be well bonded. Shoot some compressed air into the first. If it escapes out the second, you’ve got issues. If you don’t have a problem, just fill the two holes. If you do, keep drilling holes until you get to a place where air doesn’t come out anymore. Then put epoxy in a bunch of the holes and shoot some more air in to try to smear it around as best you can in the area between the holes. Wear safety goggles and a crappy shirt for this because it’ll blow epoxy out the holes back at you. I’m still picking it out of my hair. Once you’ve done your best at forcing the epoxy throughout the affected area, fill each hole with epoxy for good measure and give it a few minutes to leech into any gap it can find. Then go push as hard as you can and shoot a couple hundred staples into the thing to try to hold it all together while it cures.
I wish I could tell you I now have confidence that (a) I found every one of the affected areas, and (b) that I feel like all of the repairs I did are “100%”. On both cases I’m nervous. But I’ll tell ya, different pieces of wood have different noises, and the framing makes things sound different at different places even on the same piece of wood. So finding all the problem spots ain’t easy. And once you’ve found them, short of turning your entire boat to swiss cheese it’s pretty tough to find the full extent of the affected area in attempting to drill enough holes to open it all up to inject epoxy. And even when you’re comfortable you did that right, did the air gun really blow epoxy into all the places it needed to go? Who knows.
I take solace in a couple of facts, though. First, this is in the boundary between the first and second layers of planking. That means that assuming I learn some lessons from this and do better on the next layer, I’ll have 1/3″ of wood and a thick layer of glass that are integral over the top of whatever soft spots may remain. That’s a pretty stout “hull” in its own right for an 18′ boat. Second, and to the point I just made, Timm tells me he designed this thing to withstand 4G of pounding. I’m building a tank, here. If it’s a bit thin in some places, I’ll probably still be okay.
The bigger concern is that voids collect condensation over time, but if this develops some rot in 20 years… well… I built it the first time, I can probably fix it. :-)
My dad’s off to Fallen Leaf for the weekend. I’m going to spend tomorrow dealing with the remaining soft spots I found, and then trying to do a better job of fairing the hull prior to layer 3 than I did before layer 2. I think that’ll help minimize the number of places I get air bubbles.
Onward and upward!
-Ben