
We’re working inside the hull, now. Some of it is straightforward and laborious. Some requires lots of mulling and tinkering, but very little actual effort. It’s a nice balance. But it’s taking too long.
The first thing we had to do was sand the rough bits of epoxy and such off the inside. Not too bad. Then we had to fillet the stringers and frames to the hull. This needs to be done for all the frames and stringers – above and below the deck – but we decided to start by just doing the below decks areas under the theory that it’ll be easier to fillet the upper parts once the deck is in and we’re not tripping on framing trying to move around.
This took a day and a half or so to do, and it takes a startling amount of epoxy and filler. Some of the fillets are best made quite large to distribute the load, and the majority of them need to be done carefully so they’re smooth when you come back to tape over them with glass. Invariably, they’re not perfectly smooth, however, and so there was a day of sanding and “tuning” that had to be done after the fillets went in before we could do the taping.
The tape had to completely line all of the seams of the compartments framed by the stringers and hull, which required just under 100 yards of tape and over 4 gallons of resin. Timm specified 1808 tape which is (a) hard to find, and (b) sucks up a huge amount of resin. I think it’s probably overkill, but I’d rather overbuild than underbuild when it comes to things that affect structural integrity of the hull. 1708 tape can be had anywhere, but 1808 I had to order from an eBay seller. Timm was pretty adamant that I should use the 0-90 1808 over the 45-45 1708…
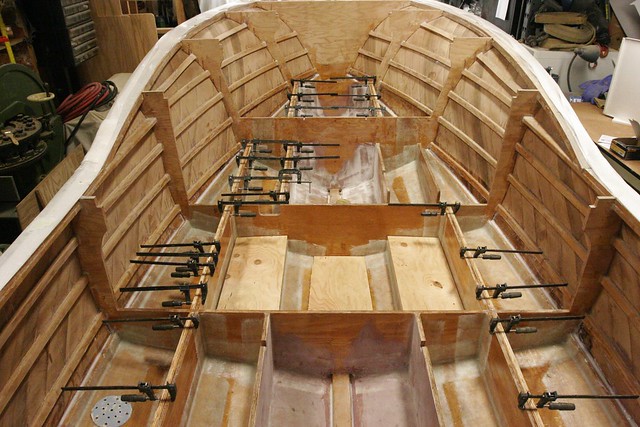
I wasn’t very good about taking photos as I went along, but here are some good shots.
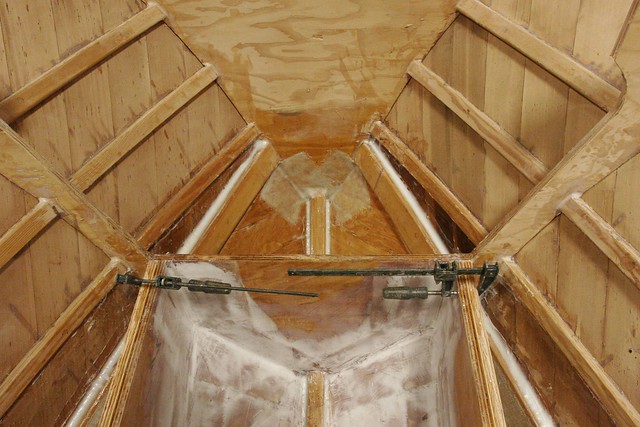
In this one, you can see the filleting around the chine logs and keel, and you can see the tape in that foremost compartment. The tape in the main compartment is covered with fairing compound. I decided to fair smooth all the man-accessible compartments since invariably I’ll be crawling around in them someday and I don’t want to get fiberglass splinters.
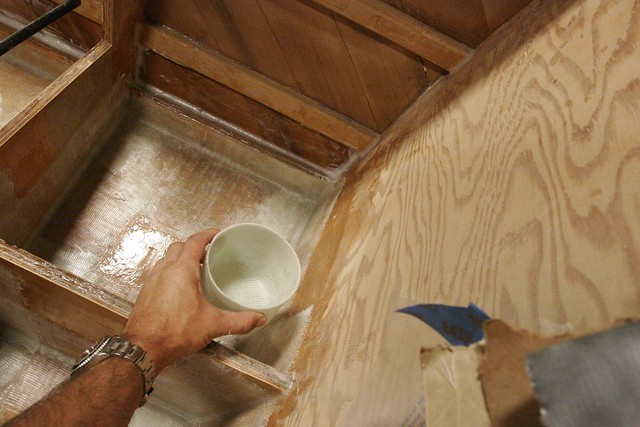
Here you can more fully see the taping of the frames and stringers.

As this was all going on, I was contemplating the question of scupper drains for the deck. Timm’s design is for a self bailing hull with scupper slots cut in the transom at deck level. The problem is that this is very close to the waterline. After some reading on the web which suggested that scuppers are one of the leading causes of small boat sinking, and also some discussion with Timm, I decided to abandon the self bailing feature and configure things so water that comes aboard gets pumped out.
This doesn’t mean I want it to end up in the bilge. I’m going to work pretty hard to keep the bilge of this boat dry by putting hatch seals in the deck and such, so I decided to create a sump under the motorwell just forward of the transom, and set two scupper drains in the aft corners of the deck that drain to the sump. The sump will have a float switch inside it – accessible via an inspection port so it can be replaced when it fails – and will be connected to a macerator pump that will purge the sump when it fills. This is all very complicated to implement, but it’s actually a pretty simple system and should work well.
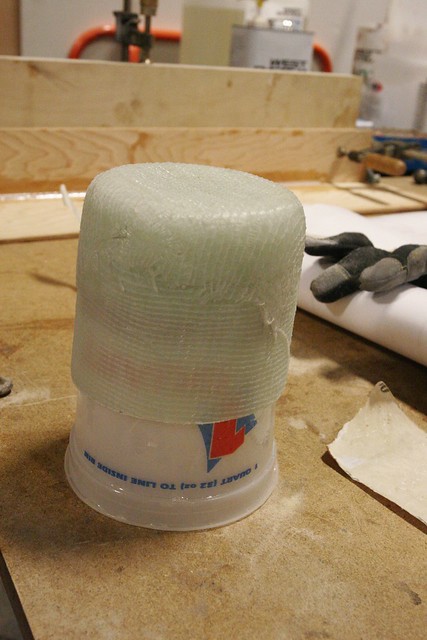
To make the drains for the corners of the deck, I cast glass over a pair of quart mixing cups to create 4″ diameter fiberglass cups.

These will sit about here:
Because these compartments will be filled with foam, the plumbing connecting the cups to the sump will not be serviceable. It needs to last forever. I ordered some 1″ ID pultruded fiberglass pipe from McMaster-Carr so I can create a completely fiberglassed system with no joints.
Just before we ran the cut files for the deck, I added 4″ cutouts for these cups. The interesting trick will be to get the cups and pipe all epoxied together in just the right position so the cups line up just under the holes in the deck. That’s a “to be done” project.
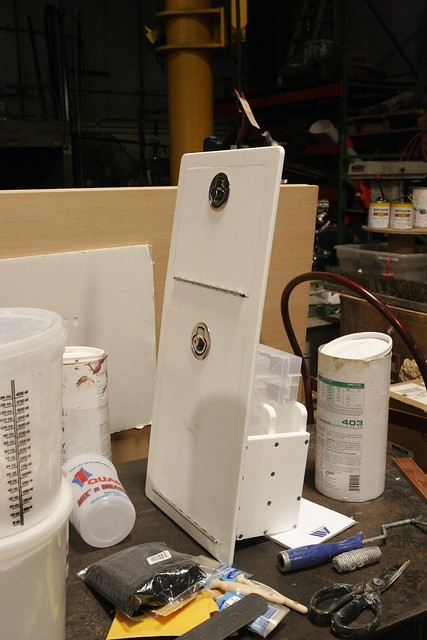
Here’s the sump box in progress. You can see the lower hole which will get a bulkhead hose fitting to connect to the pump. The upper hole with the bolt circle around it is for the SeaBuilt 6″ stainless steel inspection port. The switch will be mounted to the back side of the port cover, and the wires will route through the cover using IP68 rated cable glands. That way, when the cover is removed all the wiring and the switch comes with it so it’s easy to service.
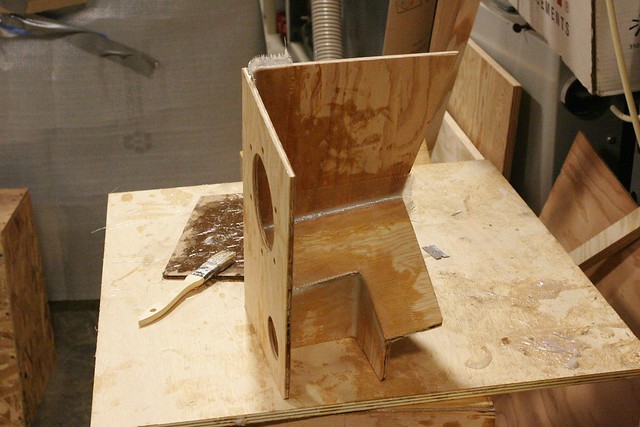
You can see looking at this that I’ve made it as complicated as I possibly can ;-) The interior framing is intended to minimize the amount of water that can collect below the level of the pump’s pickup, so there will be as little standing water left as possible when the switch shuts off. If it’s not clear, this gets mounted in the corner formed by the inboard port stringer and the transom, which provide the other two “walls” of the sump. Once it’s all together and I confirm it’s watertight, I’ll glass a lid onto it.
I ordered a bunch of Molex MX150 connectors. These are rated to 20A and are IP68 rated. This will make it easy to connect and disconnect pumps and other parts without tools, and the connections will be watertight. The crimper pliers appear to be unique to the MX150 pins, so I had to order those too. $120. Awesome.
The mechanical space – the aft most storage area just in front of the motorwell – will have all the pumps, throughhulls and other mechanical bits. This includes:
- Macerator pump for deck sump
- 1500GPH Bilge pump
- Livewell pump
- Washdown pump
- Fuel filter
- Oil reservoir
- Sonar transducer
The livewell pump and washdown pump share a single 3/4″ throughull with a seacock. The only other hull penetration below the waterline is the transducer. I’m opting not to install a drain plug. The pumps should be sufficient, and we don’t get freezing weather around here so it’s not critical that the hull be completely, totally devoid of water.
This is a lot of stuff to screw to the wall of the mechanical space and my experience in the past has been that because these items fail from time to time and need to be replaced, the screws tend to loosen and the wood behind them gets damp. I decided to order some brass E-Z Lok threaded inserts. I’ll drill holes in the appropriate locations, screw them in once to create the threads, then take them out and soak the holes with epoxy which will cure before I put them back in with a dab of 4200 sealant. That’ll make them more removable later. Once these are in place the pumps and other machinery will thread into them with machine screws instead of wood screws. The machine screws can go in and out as often as needed without damaging the wood. I was a little hesitant about using the brass inserts since I’ll probably use stainless screws and, especially in salt water environments, you need to worry about galvanic corrosion. Brass and stainless are pretty compatible though, and I can always use brass machine screws if I want to be really safe.
Other developments include the installation of the first half of the frame/stringer doublers which create a greater bonding surface for the deck. You can see those, as well as the to-be-sealed and installed tank supports in this photo:
For most of these doublers I’m using scrap 3/4″ plywood, but the areas around the fuel tank are supposed to be solid wood because the access hatch over the tank is held down with screws not epoxy, and screws don’t hold well in the edge grain of plywood. Unfortunately there was a foul-up with the cut files and so a void that was supposed to make room for a special piece of solid wood for this purpose was omitted. I have to decide how to handle that situation, still.
I’m also continuing to work on the CNC-cut storage units for the leaning post. Here’s the first of them. It’s nearly done, but there’s still work to do. There’s always work to do…
Okay, so from here we need to get the plumbing glassed in for the deck drains, glass in and seal the sump, do the final epoxy sealing of the insides of the hull. Install the last of the doublers, and foam the floatation compartments. Then I’ll paint the storage/mechanical spaces with white-tinted epoxy, install the machinery, and move onto the decking. Yee haw…
-Ben